Imagine having a brush, canvas, and paint palette with 16.7 million colors. Better yet, let’s drop a billion colors on that palette. Your inner Bob Ross is calling, and it’s time to bust out that titanium white, dark sienna, and van dyke brown.
Remember: we don’t make mistakes, just happy little accidents.
Um, what?
In our digital age, graphics programmers are in the forunate position of being painters with nearly limitless canvases. That palette of 16.7 million (or a billion) colors isn’t hypothetical, and canvases exist in every computer screen, laptop, cell phone, and even…refridgerators (for some reason). Many millions of colors is certainly enough to achieve every artistic vision you could possibly come up with…right?
Well…somewhat surprisingly, no. 16.7 million colors may be good enough for the aspiring digital fridge artist; but millions of colors just doesn’t cut it when creating computer graphics for games. The digital version of relatively simple things, such as gradients, aren’t achieved as simply as their real world oil paint counterparts.
Have you ever seen something like the top left of the image below? Look closely! If you viewing on a phone, turn the brightness and contrast of your display up.
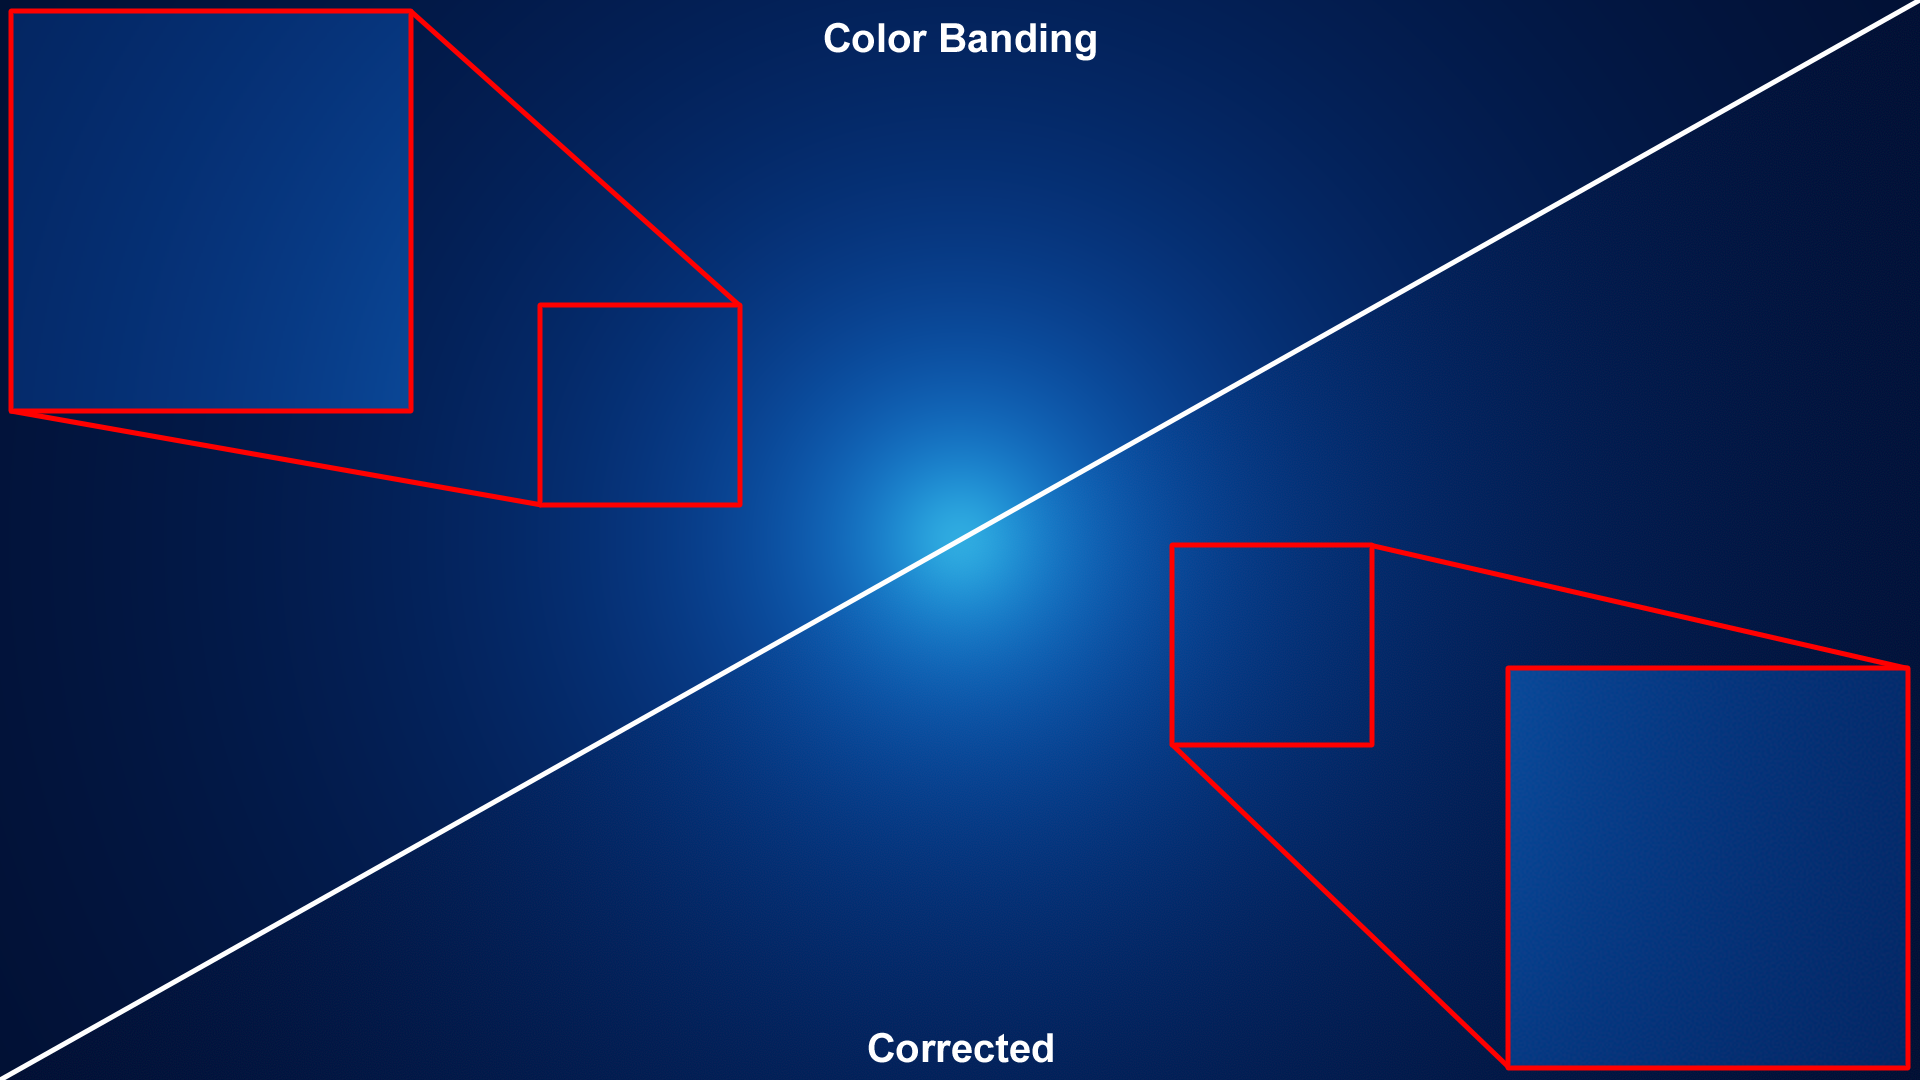
The intended result is shown on the bottom right: a smooth gradient from a bright blue to a dark blue. On the top left, visible striations (“bands”) are visible where color transitions abruptly from one to the next. This phenomemon is commonly referred to as color banding.
Why?
Images displayed by digital screens are composed of a combination of three primary colors (usually red, green, and blue). This mimicks what painters and artists have done for centuries by mixing various colors to create a broader range of total color. This approach works because of how the cones of the human visual system are constructed. In fact, the tristimulus theory states that all colors perceivable by the human eye can be created by combining just three primary colors.
Cool! So, what’s the problem? Unfortunately, digital screens aren’t perfect. Each display has a dynamic range : the set of colors it is able to reproduce. The standard dynamic range (SDR) of a display, also referred to as low dynamic range (LDR), typically represents each primary color value with an 8-bit binary number (that’s a sequence of eight 0s or 1s. For example, 10010010 is the 8-bit binary reprentation of 146). 8-bit numbers can represent 256 unique values for each red, green, and blue component, and results in the 16.7 million possible color combinations I mentioned earlier. Although that sounds like a lot, this is the crux of the problem.
The color banding artifact is actually quantization error. The color that needs to be displayed can’t be represented by the values in the standard dynamic range. In the real world, color is a continuous function (a wave), and we are approximating that function with 8-bit numbers for each of the red, green, and blue frequencies.
What to do?
Color banding (or SDR Color Quantization if you want to sound smart at a party) can be very jarring when in motion on a digital screen. So, what’s a graphics programmer to do?
The simplest solution is the first one that may have come to mind: use more bits! Increasing the number of bits used for the red, green, and blue frequencies reduces the amount of quantization error possible. This is exactly what high dynamic range (HDR) displays do. They represent each primary color value with 10 (or more) bits, resulting in (at least) one billion color possibilities. As a result, color banding artifacts are substantially reduced in HDR, and while still possible, are much less noticable than in SDR.
The real problem though is that the majority of displays in the world (today) are not high dynamic range. For the time being, we need a solution to remove or reduce banding without changing the display itself. The human visual system is highly tuned to detect patterns and structure, so color quantization appears as obvious structured bands. We can’t eliminate the quantization caused by SDR’s limitations, but what if we changed the organization of the quantization (i.e. move it around)? Can we change the quantization’s underlying structure so that our visual system perceives something different (and hopefully better)?
This is where dithering comes in. Wikipedia has a great page on dithering, and defines it as “an intentionally applied form of noise used to randomize quantization error, preventing large-scale patterns”. Exactly what we are looking for!
Sidenote: the Wikipedia page on dithering has a fascinating tidbit about an early use in WW2:
[O]ne of the earliest [applications] of dither came in World War II. Airplane bombers used mechanical computers to perform navigation and bomb trajectory calculations. Curiously, these computers (boxes filled with hundreds of gears and cogs) performed more accurately when flying on board the aircraft, and less well on ground. Engineers realized that the vibration from the aircraft reduced the error from sticky moving parts. Instead of moving in short jerks, they moved more continuously. Small vibrating motors were built into the computers, and their vibration was called dither from the Middle English verb “didderen,” meaning “to tremble.”
Much like the mechanical computers on those WW2 planes, our goal is to reduce error and represent values more continuously. By applying random noise to an image, we reorganize the structure of quantization error and create an image with colors closer to the continuous signal we are approximating.
Generating Noise
Introduce random number generation as a topic - point to resources, since this is a deep area. Introduce probability denisty functions - talk about uniform vs. triangular distributions. Point to Tom’s ShaderToy, use images of it.
Show me
Alright, time for rubber to meet road. I put together a D3D12 code sample that applies various types of random noise to dither an image that suffers from color banding. You can check it out on GitHub. The code is completely free with a permissive license, so you can do whatever you want with it.
The sample demonstrates dithering a few ways:
1) Uniformly distributed white noise generated on the GPU using Nathan Reed’s Wang Hash approach.
2) Triangularly distributed white noise. This is implemented by either a) generating and averaging two uniformly distributed random numbers or b) generating a single uniformly distributed random number and transforming its
2) Uniformly distributed blue noise computed offline and loaded as textures. The blue noise textures were generated by Christoph Peters. You should check out his great blog post about them.
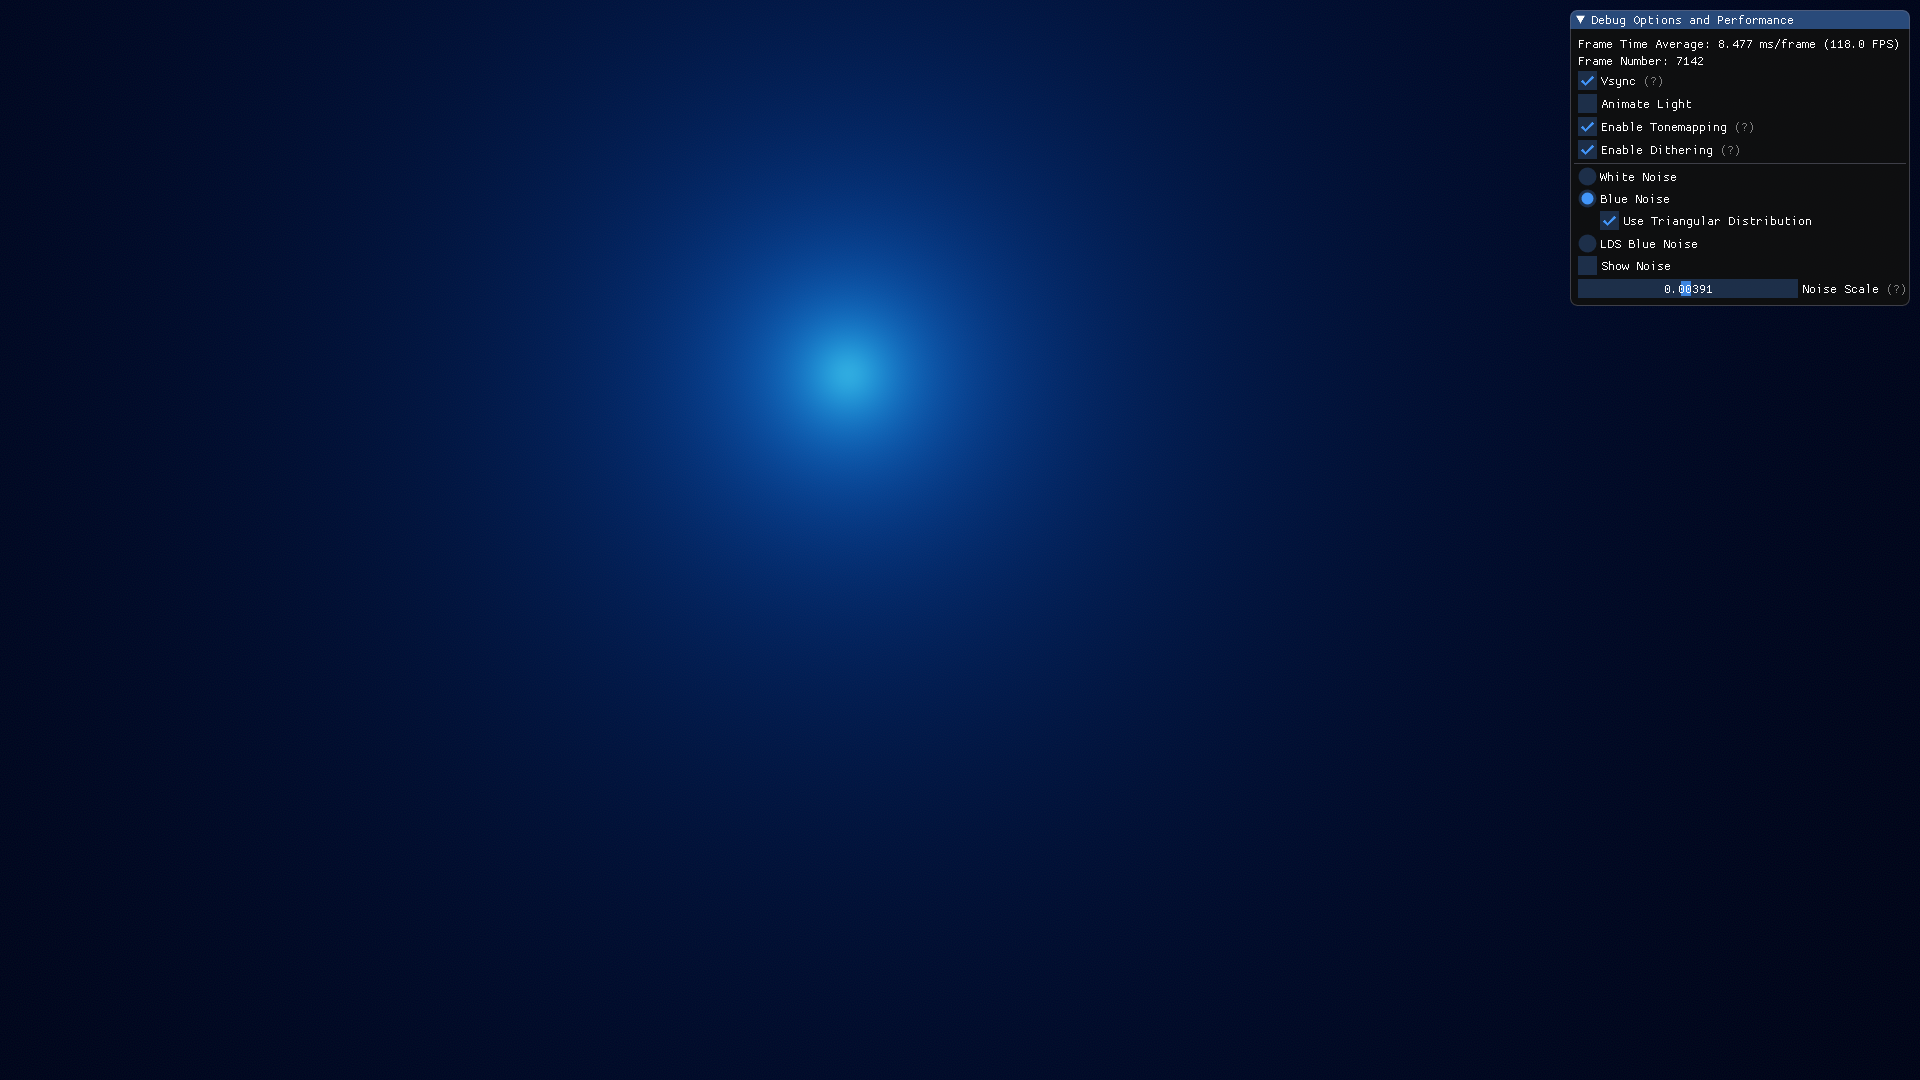
The sample application includes a small UI (ImGui FTW) where you can swap the noise type used, animate the light, and change the magnitude of the noise. There’s also a “show noise” option, so you can see the noise patterns being generated. At the default noise scale settings, the noise won’t be visible, but clever readers will find out how to change that by modifying the code.
Last but not least, if you found this topic interesting, you should absolutely watch PlayDead’s GDC 2016 talk, “The Rendering of Inside: Low Complexity, High Fidelity”. Mikkel Gjol and Mikkel Svendsen describe how noise and dithering were used to incredible effect in their 2016 masterpiece of a game, and provide more technical details about the theory and implementation.
I’ll leave you with a quote from the talk I think is spot on:
[Dithering] is spectactularly easy to add, and rather cheap as well, so there’s no reason a game should ship with banding.
Go forth and dither!